Difference between revisions of "Holonomic Robotic Platform"
Joelmartin (talk | contribs) |
|||
| Line 289: | Line 289: | ||
print ("Cannot be executed unless main") | print ("Cannot be executed unless main") | ||
</source> | </source> | ||
| + | |||
| + | ===Mathematics=== | ||
| + | See this journal article: | ||
| + | Rojas, R., & Forster, A. (2006). Holonomic Control of a robot with an omnidirectional drive. Kunstliche Intelligenz, BottcherIT Verlag. Retrieved from https://www.mindraces.org/public_references/idsia_publications/omnidrive_kiart_preprint.pdf | ||
Revision as of 15:52, 25 February 2020
Engineering Project Data
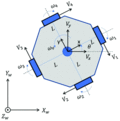
A holonomic system is when the number of controllable degrees of freedom equals the total degrees of freedom. Video of Holonomic Car
Mechanical
Omni Wheels and Positioning
- Omni-wheels are often used to allow for movement on the horizontal axis on a drivetrain, as well as forward and backward movement.
History
US patent 1305535, J. Grabowiecki, "Vehicle wheel", issued 1919-06-03 A variant of the wheel was patented by Josef F. Blumrich in 1972. US patent 3789947, Josef F. Blumrich, "Omnidirectional wheel", issued 1974-02-05
Drive Motors with Gearboxes
- 3-6 VDC, Bidirectional
- Gearbox Motor with a gear ratio of 1:48
- 2 x 200mm wires with breadboard-friendly 2.54mm(0.1”) male connectors
- Maximum torque: 800k.cm
- Available on Amazon
Absorbers and Springs
Drive Shafts with Universal Joints
Hardware Case for Raspberry PI 4
Electronic/Electrical
Raspberry PI4 4 Gig Ram
Pi Setup
- Raspbian System Image was downloaded from RaspberryPi.org to development laptop.
- Belana Etcher Disk Flasher was downloaded and installed on laptop.
- 64 Gigabyte Micro SD Card was placed in San Disk adapter and mounted on laptop.
- Micro SD card was flashed with Raspbian OS, then removed from Laptop and inserted in to PI 4.
- HDMI Video 4K Monitor connected to PI via Mini-HDMI adapter, as well as USB Keyboard and Mouse connected to PI 4.
- PI 4 was powered on, and OS Install and Finalization was initiated.
- PI Wi-Fi connection to Router was verified, with static IP address assigned to PI 4.
- PI 4 initiated software updates via internet connect.
- VNC Server was setup on PI 4 to connect to Laptop via Port:5900.
- VSFTPD was installed on PI 4 to handle file transfers between Laptop and PI 4 using FTP client on Port:21.
- PI was Powered Down, and USB and video cable removed from PI,
- PI was powered up as a stand alone device.
- VNC Wi-Fi connection was initiated between Laptop and PI successfully.
- Development now takes place across Network VNC connection, with PI as a Standalone Computing Device.
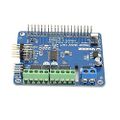
Raspberry PI Full Function Servo Motor HAT Controller
- Full function Robot Expansion Board (Support Stepper / Motor / Servo) for Raspberry Pi.
- Stepper motors are great for (semi-)precise control, perfect for many robot and CNC projects.
- HAT supports up to 2 stepper motors. The python library works identically for bi-polar and uni-polar motors
- For a complete in-depth explanation of using this HAT see the Raspberry PI Wiki: Robot Expansion Board.
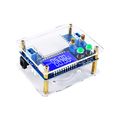
Battery Power Regulator
- DC In 5.5-30V, Out 0.5-30V adjustable voltage range, 35W 4A high power, buck-boost converter can be used as ordinary Buck power supply module, charger and LED constant current driver.
- HD LCD display
- input voltage
- output voltage
- current
- power
- Support for charging function
- anti-reverse protection
- anti-backflow protection,
- short-circuit protection
- over-current protection
- over-temperature protection*
over-voltage protection.
HDMI Video Adapter Cable
Micro SD 64 Gig Memory Card for PI Operating System, and Hard Drive
Software
Raspbian Operating System
Balena Flash Prom Programmer
Windows Python for Laptop Host Development
Spyder Development Environment
Spyder is a powerful scientific environment written in Python, for Python, and designed by and for scientists, engineers and data analysts, featuring the following options:
- Editor
- IPython Console
- Variable Explorer
- Profiler
- Debugger
- Help
Code and Mathematics
Code to Facilitate Development
To help easy development of specific modules in the Holonomic Robot, a communications interface is implemented between the Robot(Raspberry PI 4 Server) and a Laptop Development workstation(HP Client). The protocol is built on TCP Tx-Rx Exchange between the two devices. The code modules are Python running at both ends. The Robot starts out as a purely slaved device taking commands from the laptop. Motor control modules manipulating the GPIO interface run on the Robot but are commanded by the laptop. As the motor control is refined and routinized along with the growth of intrinsic autonomy, the code is transitioned from the Laptop to the Robot. Code is primarily developed in Python 3.7.
Laptop Code for Robot/Laptop Base Communication
# -*- coding: utf-8 -*-
#author: joel.martin
#import the modules required here
import PySimpleGUI as sg
import socket

GRAPH_SIZE = (700,300)
GRAPH_STEP_SIZE = 1

sg.change_look_and_feel('GreenMono') # give our window a spiffy set of colors

layout = [[sg.Text('Robot Message response', size=(30, 1))],
          [sg.Output(size=(30, 20), font=('Mono 9')),
           sg.Graph(GRAPH_SIZE, (0,0), GRAPH_SIZE, key='-GRAPH-', background_color='lightblue')],
          [sg.Text('Robot Command Entry', size=(30, 1))],
          [sg.InputText(size=(30, 0), key='-QUERY-'),
           sg.Button('Send Command',size=(20,1), button_color=(sg.YELLOWS[0], sg.GREENS[0]), bind_return_key=True)],
          [sg.Button('Halt Everything',size=(20,1), button_color=(sg.YELLOWS[0], sg.GREENS[0]))]]

main_window = sg.Window('Robot Window Control', layout, font=('Helvetica', ' 11'), default_button_element_size=(8, 2))

#start executing here
if __name__ == '__main__':

    message_from_bot = ''
    client = socket.socket(socket.AF_INET, socket.SOCK_STREAM)
    client.connect(('192.168.1.132', 13000))
    escape = True

    while escape == True:
        message_from_bot =''
        event, value = main_window.read()
        if event == 'Halt Everything':
            message_to_bot = "SRS"
            client.send(message_to_bot.encode())
            break
        if event == 'Send Command':
            message_to_bot = value['-QUERY-'].rstrip()
            client.send(message_to_bot.encode())

        message_from_bot = (client.recv(4096)).decode()
        print (message_from_bot)
        if message_from_bot == "RxAck:Engaging Robot Shutdown" : escape = False

    main_window.close()
    client.close()
    print ("You ended the Robot Server Session")
Robot Code for Robot/Laptop Base Communication
# -*- coding: utf-8 -*-
#author: joel.martin
#import the modules required here

import os
import socket
from Raspi_MotorHAT import Raspi_MotorHAT, Raspi_DCMotor
import time
import atexit
# create a default object, no changes to I2C address or frequency
mh = Raspi_MotorHAT(addr=0x6f)
# auto-disabling motors on shutdown
def turnOffMotors():
    mh.getMotor(1).run(Raspi_MotorHAT.RELEASE)
    mh.getMotor(2).run(Raspi_MotorHAT.RELEASE)
    mh.getMotor(3).run(Raspi_MotorHAT.RELEASE)
    mh.getMotor(4).run(Raspi_MotorHAT.RELEASE)

def motorcontrol(motor,speed,direction):
    if (speed == 0):
        mh.getMotor(motor).run(Raspi_MotorHAT.RELEASE)
    else:
        mh.getMotor(motor).setSpeed(speed)
        if (direction == "FOR"):
            mh.getMotor(motor).run(Raspi_MotorHAT.FORWARD)
        elif (direction == "REV"):
            mh.getMotor(motor).run(Raspi_MotorHAT.BACKWARD)
        elif (direction == "REL"):
            mh.getMotor(motor).run(Raspi_MotorHAT.RELEASE)

def motortest(i):
    motorcontrol(i,100,"FOR")
    time.sleep(.1)
    motorcontrol(i,100,"REV")
    time.sleep(.1)
    motorcontrol(i,100,"REL")

def rotate_bot(direction,speed):
        if (direction > 0):
            motorcontrol(1,speed,"FOR")
            motorcontrol(2,speed,"FOR")
            motorcontrol(3,speed,"FOR")
            motorcontrol(4,speed,"FOR")
        elif (direction < 0):
            motorcontrol(1,speed,"REV")
            motorcontrol(2,speed,"REV")
            motorcontrol(3,speed,"REV")
            motorcontrol(4,speed,"REV")
        time.sleep (3)
        #look at the IMU and loop until reaching degree limit
        turnOffMotors()


#the main loop starts here
if __name__ == '__main__':
    #setup the communications with the development control here
    serv = socket.socket(socket.AF_INET, socket.SOCK_STREAM)
    serv.bind(('192.168.1.132',13000)) #this is for the Rasberry pi
    serv.listen(5)

    print ("Going into commanded mode")
    escape = True
    while True:
        conn, addr = serv.accept()
        message_from_client = ''
        while (escape == True):
            data = conn.recv(4096)
            if not data: break
            message_from_client = data.decode()
            print ("Tx:" + message_from_client)
            #receives a motor drive message
            if message_from_client[:3] == "MOT":

                message = "RxAck:Engaging Motor Message"
                conn.send(message.encode())
            elif message_from_client[:3] == "SRS":
                turnOffMotors()
                message = "RxAck:Engaging Robot Shutdown"
                conn.send(message.encode())
                escape = False
            elif message_from_client[:3] == "TST":
                message = "RxAck;Testing Motors"
                conn.send(message.encode())
                message = "RxMsg;Testing 1\n"
                conn.send(message.encode())
                motortest(1)
                message = "RxMsg;Testing 2\n"
                conn.send(message.encode())
                motortest(2)
                message = "RxMsg;Testing 3\n"
                conn.send(message.encode())
                motortest(3)
                message = "RxMsg:Testing 4\n"
                conn.send(message.encode())
                motortest(4)
            elif message_from_client[:3] == "ROT":
                message = "RxAck;Rotating Robot"
                conn.send(message.encode())
                rotate_bot(30,255)
                message = "RxAck:Rotated"
                conn.send(message.encode())

            else:
                message = "RxAck:" + message_from_client
                conn.send(message.encode())
        conn.close()
        if message_from_client[:3] == "SRS":
            print ('Coms and Robot Control termintated at Server by Client')
            break
    #robot server system shutdown, terminate everything
    turnOffMotors()
else:
    print ("Cannot be executed unless main")
Mathematics
See this journal article: Rojas, R., & Forster, A. (2006). Holonomic Control of a robot with an omnidirectional drive. Kunstliche Intelligenz, BottcherIT Verlag. Retrieved from https://www.mindraces.org/public_references/idsia_publications/omnidrive_kiart_preprint.pdf


